Rivoli Drop Earrings Tutorial

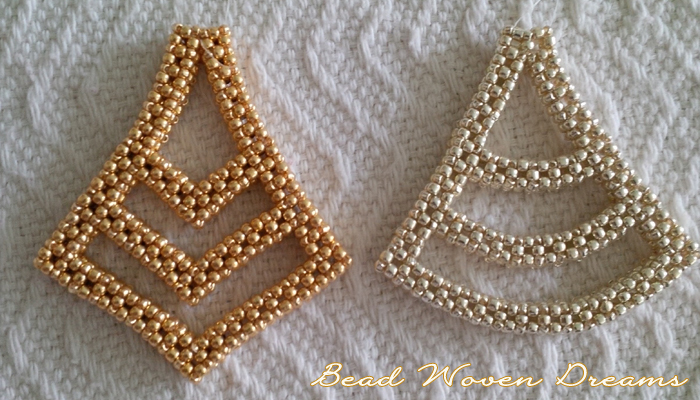
Been a while since I came up with a free tutorial, but after making these earrings I thought they would make the perfect one to share. Not only do you get to learn how to make these really pretty earrings, you also get to practice bezeling using RAW (Right Angle Weave). If you haven’t done so before, this is a great project to start.

fb-display

Due to the flexibility of this bezel technique, you can use any size rivoli or stone!

I’ve split up the video demo into two parts:

Right Angle Weave Bezel: https://www.youtube.com/watch?v=H7zboh8uzKs
Adding the Herringbone Arms: https://www.youtube.com/watch?v=l1SXP0V9KBU

You can also download the free PDF here: Rivoli Drop Earrings Tutorial

Feel free to share the PDF and videos with your beading friends, and have lots of fun making these pretty earrings!

Happy Beading!
-Mandi

Val D’or Necklace: The back story

vsketchfirstbezeledbicone

Okay. So here’s the back story of the Val D’or necklace. What you’re looking at is a sketch of a design idea I had, and the very first bezeled bicone taken back in February. I had this idea to make a bracelet and I sketched it out. It was to be a chain of herringbone that snakes around bicones. This inspired me to come up with my bezeled bicone technique to match my sketch.

So I’m working on implementing the sketch and it’s going so well and looking so pretty… then after beading a few inches I put it on my wrist to see how it would bend. Total and utter failure. It warped so bad! I tried many different ways to get it to wind around the bicones and still bend around my wrist and still it warped. I was so upset! I dropped everything and was 2 seconds away from swearing off beading for life. I would watch tv and would look over at it on my coffee table with such disappointment and sadness. And frustration lol.

Then one day I just looked at it and said “no, it’s not supposed to be a bracelet… it’s a necklace!” I held it up to my neck and saw how pretty it looked! so I kept it up and made my first necklace design.

Yes, you read that right. Val D’or is my first necklace design. Not Soiree, or The Duchess. Val D’or. I just kept it under wraps since February till I decided what I would do with it. I wasn’t sure yet. But after much consideration and the go ahead to publish it on Etsy, I decided to share it with the world this weekend.

The only people to see it were just a few friends online, and my bead friends at 1 Stop Bead Shop. After I finished it, I noticed way too many mistakes so I said I would do it over. I went to the store one day and they all asked me, “where’s the necklace?” and so I pulled out a little clear baggie and showed them. It was reduced to a pile of gold beads and aquamarine bicones. Oh the looks of shock and disappointment! Lol it was kinda funny, but I had to get it right and fix the mistakes before I shared it.

So that’s how beading is sometimes. You get and idea, it might work or it might fall apart. Or, you think it fell apart but it really didn’t. It just wanted to be something else. Just listen to the beads, they talk. They have wisdom. ‎Let them speak, and something beautiful will unfold.

valdor1

Happy beading!

 -Mandi

Using herringbone stitch to make a square toggle

I truly do love working with herringbone. It’s such a fun and versatile stitch, and so much can be done with it, like making a toggle.

img_20160905_185927

I wanted to make a toggle that matches the stitch I was working with in my latest necklace design, so I challenged myself to come up with something and I must say, I really, really, REALLY like this! I made a video tutorial to share with anyone wanting to learn how to do this. Hope you enjoy this, and use this in your future beading projects 🙂

To view the video, click here.

For written instructions and diagrams, click here to download the pdf.

Happy beading!
-Mandi

Embrace Pendant

My first pendant design… yay! I wasn’t planning on it. I was working on a simple Cubic Right Angle Weave sample for a class to teach at my bead store when I thought “hmmm, I wonder if anyone created a pendant like this?” So I got to sketching two versions last Sunday. By Tuesday they were both done.

wp-display-1

I used True 2 Fire Polish rounds on the front of the pendants. I like that True 2s match the width of a seed bead, so you can add a bit of bling by replacing a few beads.


wp-display-2

The angular version was my first version.


wp-display-3

This curved version is the second. I did it just to see how it would look. I like them both. They have different feels to them.


wp-display-4

Here’s how they look on the back. Still looks really pretty. So you can make them with the True 2s or just all seed beads.

The pattern is here on my Etsy, and it covers both the angular and the curved versions.


Happy Beading!
-Mandi

Ajra Bracelet

My newest bracelet design. I call it the Ajra Bracelet. I actually had and drafted another idea for using Czechmate tiles and bicones but boy did that idea fall apart. I was rather disappointed. But then I decided to keep stitching and see what happens. As usual, my best designs are happy accidents.

Ajra Bracelet

You can see from this angle the bicones are sitting on top of the Czechmate tiles.

Ajra Bracelet

The tiles are what lay on the wrist flat. Bicones can be kind of sharp, so with them laying on top, it makes it very comfortable to wear.

Ajra Bracelet

The stitch used is just simple Right Angle Weave, so it’s very easy for beginners. But even with such simplicity, this bracelet really stands out and is quite a stunner. There’s just enough bling, but not too much to overshadow the pretty color and texture of the Czechmate tiles. I think there’s harmony :).

For the tutorial on my Etsy, click here. Hope you enjoy it!

Happy beading!

-Mandi

Beaded Chain Mesh Bracelet

Finally, a pattern for beginners! This one is made of odd count peyote and a little trick to make the open spaces between each peyote section. This way, it keeps the stitching continuous, instead of making separate peyote sections then weaving them together at the end. 

Beaded Chain Mesh Bracelet

Beaded Chain Mesh Bracelet. Nickle plated silver seed beads and matte black cubes.

I think the name fits. Peyote stitching has a way of being kinda stiff, especially in bracelets. But with the sectioning and adding cubes or spacer beads it drapes like fabric, or chain.

Beaded Chain Mesh Bracelet

Beaded Chain Mesh Bracelet. 8/0 seed beads in Green Opaque Luster, and silver plated spacer beads.

I also used the word “mesh” because quite honestly peyote has a mesh like pattern to it. And to me, something about this bracelet really brings that out and showcases it.

For these bracelets I used snap clasps instead of my usual tube clasps. I’ve even made a video tutorial on how to add snap clasps to any peyote bracelet. You can view it here.

And for the pattern of this bracelet, you can find it here on my Etsy. Click here.

Happy Beading!

-Mandi

Evening Leaves Earring Tutorial

IMG_20160111_153827_edit

Shiny Plate Silver beads and Air Blue Swarovski Bicones

I love Reign. It’s one of my fav tv series I watch on Netflix. I find their clothes and jewelry very well designed and inspirational. And one of the episodes, “Consummation” inspired me to design these earrings.

From "Reign", season 1, episode "Consummation"

From “Reign”, season 1, episode “Consummation”

In this episode Mary, Queen of Scots gets married (finally!) to the Dauphin of France, Francis. Her mother gave her these earrings to wear during her wedding and celebration. I loved the design of them and while I knew I couldn’t replicate it exactly, it was worth the shot.

IMG_20160111_155355

And I love the final product! Here they are in Black and Nickle. As for the ear wires, there are none. I decided to stitch around a flat glue-on post for a different look. The pattern covers not only this design but also the technique to stitch around a flat post with a bicone on top. This technique can be used for many other earring designs as well if you want to try something different other than ear wires.

For the pattern in my Etsy shop, please click here.

Hope you enjoy making them!! I’ve worn a pair and got a ton of compliments at work.  They just look like leaves gracefully hanging from your ears.

Happy Beading!
-Mandi

Using herringbone stitch to create a rivoli bezel setting

Hi Beaders!

Such wonderful things can happen when you’re A) having fun or B) go where you’re curiosity takes you. This Sunday was such a day. I recently purchased a Chinese crystal rivoli from work just to practice with. Not as brilliant as Swarovski, but will do just fine to play with. I wasn’t up to trying to figure out how many beads I needed to make a peyote bezel, so out of curiosity I wanted to see what a herringbone bezel could look like.rivoli1

I’m happy to say it came together much better than I thought! So I made a video showing my steps on how to do this.

I’m now aware that there are a few beaders that have done this kind of bezel but I only found out after I made mine, so I didn’t learn this or lift this technique from another beader. Honestly I think it’s just a natural progress in beading. Just be curious, ask questions and see where your curiosity takes you.

For the video tutorial, please click here. Feel free to share with your rivoli-bezel-challenged friends! This could save lives!

LOL, well, not lives… but it could put a lot of hopeless rivolis to good use 🙂

Happy beading!

-Mandi

Herringbone Gem Drop Earrings

Lately I’ve been playing around with my Nestled Gems design to see if there was anything else I could design out of it. Maybe something will come about that would be really neat. I tried another bracelet with herringbone and eh, I kinda liked it, kinda not so I took it apart. And as I was doing so this earring design stood out to me.

IMG_20151120_150823

How cute! They’re simple but not boring. Simple elegance is what I like to call it. If you purchased the Nestled Gems pattern then this makes a great addition. If not, you can make a pair of these earrings in another way.

IMG_20151120_150745

Instead of adding a herringbone chain to just one Nestled Gem unit, I added it on top of an 8mm semi-precious round. The beads are faceted Amazonite. There’s also Chinese crystal rondelles and bicones.

To learn how to make these really easy yet elegant pair of earrings click here to watch the tutorial on Youtube. Just letting you know, you will need know how to do tubular herringbone. Hope you like it and enjoy making a pair.

Happy Beading!

-Mandi

Nestled Gems Bracelet and Earring Set

I truly do love this set a lot. One of my favorite happy accidents.

IMG_20150920_144510_hdr

I was playing around and wanted to see what would happen if I made a diamond shape with all seed beads, with four beads sticking out making corners.  Then I kept playing around, decided to pop in a crystal bicone and after a few hours this magnificent piece happened! The way I created it there is a “setting” of beads on both sides (top and bottom) that fit snuggly around the bicone.

IMG_20150920_144156_hdr

For the clasp I just attached a peyote toggle.

IMG_20150920_143158

Aren’t the earrings lovely?

IMG_20150920_143830

This set is made with all 11/0 seed beads. For this set the colors I used are the Permanent Finish Galvanized Gold, and a light aqua colored seed bead. I don’t know the exact name because I bought them at my bead store’s clearance sale. They were just in a little baggie :). The crystal bicones are Swarovski, Aquamarine Golden Shadow, 6mm. And just to let you know, Swarovski is discontinuing this color so get it while you can.

Here is another set I am working on.

IMG_20151027_092354_edit

Here I’m using Duracoat Yellow Gold, Metallic Opaque Fuchsia, and Siam ABx2  6mm bicones. I can’t wait till this one is done. With the earrings.

I also want to do one in silver. I know this is my design but I am seriously very excited about it lol. You can buy the pattern on my Etsy shop here. And once you’ve tried it let me know how you like it and send me a pic of your color theme. I’d love to see.

Happy beading!

-Mandi